Showing posts with label healthy. Show all posts

Saturday, October 13, 2012

Pumpkin Protein Doughnuts

I was a busy girl today! I took my day off to sleep in a bit. I got up around 8:30 and have been on my feet ever since running errands and cooking.

First Dylan and I ran around to several stores including Party City, Target, Bed Bath and Beyond, the local Mall to hit Hot Topic, and then finally Vitamin Shoppe.

I had a very sucessful haul today shopping. I got something for my Halloween costume, a digital scale, doughnut baking ban, brag's liquid aminos, a new pair of work-out pants, and some vanilla almond crunch Quest bars that I have not tried yet! I really have wanted a digital food scale for quite some time. Weighing food is so much more accurate than going by measurements. I hope that using it will help me to gain some lean muscle weight because my food calculations will be more accurate. I also had big plans for the doughnut baking mold. I have been eyeing this pan up for quite some time, but didn't have the money. So, I got a 20% off coupon in the mail for Bed Bath and Beyond and decided today was the day! Then, I put it to use tonight and made PUMPKIN PROTEIN DOUGHNUTS!

What you'll need:
for the doughnuts-
1/4 cup (4 tablespoons) of coconut flour
1 1/2 scoop of vanilla flavored whey protein (I used Optimum Nutrition vanilla ice cream flavor)
1/2 cup of pure canned pumpkin
1 large whole egg
2 large egg whites
1 teaspoon of pure vanilla extract
1/4 cup of raw stevia
1/2 teaspoon of nutmeg 
2 teaspoons of ground cinnamon
 1/2 teaspoon of baking soda
1/2 teaspoon of cream of tartar
1/2 cup of vanilla unsweetened almond milk

for optional "frosting":
2 tablespoons of non-fat plain greek yogurt (I always use Chobani)
1/4 teaspoon of xanthan gum
2 packets of raw stevia
5-10 drops of vanilla creme liquid stevia

Preheat your oven to 350 degrees. Mix your wet ingredients for your doughnuts together and also the dry separately before combining and mixing well. Spray your doughnut baking pan (these could very easily be made into muffins as well!) with non-stick spray. Fill the molds with your batter. I baked mine for about 15-18 minutes. Toothpick should come out clean after sticking one into a doughnut. You can top it with the vanilla creme "frosting", more cinnamon, or pumpkin flavored cream cheese spread, or get creative. These are high in protein and low in active carbs. You could eat two (...or three) without the guilt! These would be good for pre or post workout as well.

I really can not wait to make up more doughnut recipes for you guys.

I also have been working on slowly sampling Artisana products that they were kind enough to send me to write a review for you guys. I should have that up at some point later this week. I have been sampling the packets slowly because I have cut nut butters out (except for peanut flour sparingly if I need it). I know, I am such a nut butter freak. I had to cut it out because I was getting out of control with the portioning and I also want to see how cutting out some fat does for my abs. I will be eating my beloved nut butter again very soon, but for now I have been forced to be creative with my nightly casein protein snack. I have been known for using a lotttt of peanut butter. But, I like having to think up some alternatives for a couple days. 
This is so good and tastes kind-of like amazing pumpkin cream cheese. 1/2 cup plain non-fat greek yogurt (Chobani), 1/4 cup non-fat cottage cheese, 1/4 cup pure pumpkin, 1 scoop vanilla ice cream whey from Optimum Nutrition, ground cinnamon, pumpkin pie spice, 2 packets of raw stevia, and 1 tablespoon coconut flour. Mixed well topped with 1 tsp organic brown sugar, 1 tbsp coconut flour, and 1 packet of stevia along with 1 tablespoon of unsweetened almond milk and mixed well into a crumble-like texture. Finally, 2 tablespoons of Kashi go lean cinnamon crumble.


Another awesome purchase of mine this week was from Target. I finally was able to find tea that I have been looking quite some time for! Sugar Cookie Sleigh Ride by Celestial Seasonings! You probably are thinking, there is no way that a tea can taste like sugar cookies.. WRONG! This tea is so fantastic it is even boyfriend approved. With just some stevia and a little bit ok unsweetened almond milk to bring out the flavor, it tastes like a liquid cookie. Very good for soothing sweet tooth cravings like I get so badly! I also bought some French Vanilla coffee that was on sale and like most vanilla flavored things it is delicious. I gotta have a caffeine, one of my vices!

I hope you guys are having a great restful weekened!

Meg


Saturday, September 29, 2012

Cheesy Cauliflower Garlic Sticks

Sometimes I am really craving a good garlic-stick. Well, sometimes it isn't the best time to eat something super greasy from a pizza place. I decided to make a cleanish treat that would satisfy my craving for a pizza shop staple that is low carb and high in protein and made: Cheesy Cauliflower Garlic Sticks!


What you'll need:
One cup of riced cauliflower
2 large egg whites
2 tablespoons of almond flour/meal
1/2 teaspoon crushed red pepper flakes
1/2 teaspoon italian seasoning mix + some on top of the cheese
artisan blends parmesan cheese

and
parchment paper
1/4 cup reduced fat mozzarella cheese
1 clove of garlic, chopped up fine

Preheat your oven to 350 degrees. Rice your cauliflower and combine it in a bowl with the ingredients listed above except for the 1/4 cup reduced fat mozzarella cheese and clove of garlic. Take a baking sheet and put a piece of parchment paper down, then spread the well mixed ingredients onto it. Spread it out so it is a rectangle or square (or whatever shape :P). Leave a little thickness to it. I placed another sheet of parchment paper on top. Bake for about 15 minutes. Remove from the oven, flip the "crust" over and remove the sheet on top. It should be a bit browned on top. Place it back onto the baking sheet and spread 1/4 cup of the mozzarella cheese on top, sprinkle some italian seasoning mix on top of the cheese and the well chopped garlic clove. Place back into the oven for about 10-15 more minutes or until it is browned and cheese is melted. Mine made 8 garlic sticks.


For 1/2 of the cauliflower garlic sticks (mine made 8 total), there were about 182 calories, 11.2 grams of fat, 4.2 saturated fat, 4.7 grams carbs, 1.3 grams dietary fiber, 1.2 grams of sugar, and 17.4 grams of protein.

I served mine with organic traditional tomato sauce. This would also work really perfectly as a crust or pizza base. I am going to make it again with spinach, tomato, and garlic. I really hope you guys experiment with this recipe. I really enjoyed it and so did my taste tester, my Aunt.


Thursday, August 30, 2012

Fall Reflection with Personal Pumkin Pie Baked Oats

Hey everyone! I hope you are having a great Thursday. If you are like me and work Monday-Friday I bet you are as excited as me for tomorrow to be Friday. This weeks sped by and I can not believe that people are back in school and there is only one more day left in August. It really seems like as you get older, the time starts to speed by. I noticed this especially since I graduated college and work full time.

How many of you are excited for fall? After years of mulling over the question of which season is my favorite, I think that I would choose Autumn. Mild weather is so fantastic. I love being able to wear shorts and a hooded sweatshirt or a t-shirt and jeans and be comfortable. I also love the way that the air smells, dewy cool mornings, warm colorful leaves, and pumpkins, apples, and more fall foods. This will be my first fall of healthy clean eating and I am so excited to see what new seasonal veggies and dishes I can try.

I was really craving pumpkin last night, so I cracked open a can of Libbys canned pumpkin and made this for my breakfast this morning. My very own bowl of Pumpkin Pie (Baked Oats)


For this dish you will need:

1/4 a cup of pure pumpkin puree (I use Libbys)
1 large egg white
2 tablespoons of almond meal/flour
2 tablespoons milled/ground flax seed
1/8 cup (2 tablespoons) oat bran
1/4 cup of whole grain rolled oats (not instant)
pumpkin pie spice
ground cinnamon
1/4 teaspoon vanilla extract
2 packets of raw all natural stevia
5 drops vanilla creme liquid stevia (optional)

Preheat oven to 400 degrees while preparing your oats. I used about 1/2 a cup of water and cooked my oat bran and rolled oats together on the stove top first. Once cooked, I added in my egg white while continuously stirring the mixture. This ensures you won't have giant pieces of egg white sitting in your oats. I then added in one packet of raw stevia and mixed that in. Once cooked to your liking, take the egg white oats off the stove. In a separate glass baking dish or bowl, scoop out 1/4 (4 tablespoons) of pumpkin. Here is where I added the vanilla creme stevia and vanilla extract, but if you don't have it you can always omit it or use more plain stevia or sweetener of choice. I also added about 1/4 a teaspoon of pumpkin spice and ground cinnamon and mixed this all together. Then, I added the cooked egg white oats to the party with some more pumpkin spice and ground cinnamon (I love thoses spices so much!). Mixed all ingredients together well. Next, I mixed together the almond flour and ground flax seed together with another packet of raw stevia. I poured this mixture on top of the pumpkin oats like a crust. You may have some left over depending on how big your bowl is and how thick you want the crust to be on top. Throw it in the oven for about 25-30 minutes.

I let mine cool down and threw them in the fridge to keep until morning. I ate my personal pumpkin pie out of the fridge because I like cool pumpkin pie, but you can warm it in the microwave, toaster oven, or regular oven if you have more time than I did this morning. You can also top it with some light cool whip, cottage cheese, Greek yogurt, protein frosting, peanut butter, whatever your heart desires! I topped mine with some Walden Farms zero calorie pancake syrup and that was all she wrote. I was very satisfied this morning but it left me craving Autumn even more than before.

Oatmeal always helps keep me more full for longer periods of time because it is so hearty. If you eat carbs in the morning, you will have more energy and it will help curb hunger (unless you're me and will be hungry again by 9 a.m.). Carbs are an important part of a healthy diet, just make sure you are getting the right carbs! Whole grains, vegetables, fruit, and beans. Carbs are an energy source, so having them is not a bad thing! What you want to stay away from is processed crap carbs like white bread and pasta. Your food is your fuel, people! If you eat crap, you will feel like crap.


Here I am sitting at work typing this entry up and trying to make time go fast. So, I figure a lot of people who look at this are also interested in exercise and fitness. I am going to try to start posting more of my workouts so that you guys can see what routines I come up with. I like to think that my plans have been doing a good job building muscle, so here is my triceps and calves workout I am doing after work.


Exercise                                                     sets x reps

Tricp Kickbacks                                            3 x 15
Hanging Dips                                                3 x 12
Bench Dips                                                    4 x 12
Dumbbell Tricep Extension (one arm)          3 x 12
Skull Crushers                                               4 x 12
Tricep Extension (both arms)                        4 x 12
Lying Tricep Extension                                 3 x 12
Reverse Bench Press (palms face you)         4 x 10

Standing Calf Raise w/ Barbell
              toes in                                             3 x 15
              toes out                                           3 x 15
              toes parallel                                    3 x 15
Seated Calf Press (machine)                        3 x 12
Barbell Seated Calf Raise                            4 x 15


I have been trying to increase the amount of HIIT I have been doing to help shed that last bit of fat over my abs. Since my legs and glutes are still sore, and I did HIIT yesterday, I am just lifting today. I also have to do some moving tonight, so I am trying to keep my routine "light" so I don't burn myself out. More about HIIT will be on another entry at some point.


What are your feelings about Autumn?
What is your favorite seasonal produce for fall?


Monday, August 27, 2012

Chocolate Zucchini Protein Brownies

I had a ripe banana sitting around and decided to throw a few things together. I just love when something turns out just like I wanted. It's super satisfying. Today, it was Chocolate Zucchini Protein Brownies. Yes, Zucchini. Zucchinis are great for baking because they are a low carb vegetable, help keep things moist, and they blend very well with other flavors.

What you'll need:
  • 1 scoop chocolate whey protein powder
  • 1/3 grated zucchini, about 2/3 of a cup
  • 2 egg whites
  • 2 packets of raw stevia
  • 1/2 a teaspoon baking powder
  • 5 drops of chocolate SweetLeaf liquid stevia
  • 2 tablespoons coconut flour
  • 1 ripe banana, mashed
 First, I mashed up the banana in a bowl and thew in the grated zucchini. Then, I added the protein powder, stevia, and coconut flour. After it was well mixed I added the 2 egg whites and finally the liquid stevia.

Preheat oven to 370 degrees and pour batter into a baking pan lined with parchment paper. Bake for about 25-30 minutes, until you can stick a toothpick in the middle and have it come out clean.

I can not provide nutritional information, as this recipe may vary with your particular protein powder. 

Enjoy!

Wednesday, August 15, 2012

Cauliflower Crust, Garlic Chicken Spinach Pizza


Hey guys! I just sat down from finishing dinner. I had been wanting to try to make a cauliflower crust pizza but just hadn't gotten around to it. I had plenty of time so I gave it a go! I had about 2/3 of a cauliflower head. Here is the recipe for the crust of the pizza:

Oven preheated to 400 degrees
  • 3 cups of washed cauliflower, riced*
  • 3 egg whites
  • 1/4 cup ground flax seed
  • dash of salt
  • sprinkle of black pepper and oregano
Mix the ingredients well. Take the mixture and two pieces of parchment paper. Using the parchment paper, pour out the mixture in between the sheets and press it gently into a round, oval, flat, whatever shape you want. Using a baking sheet or pizza pan to stabilize the crust, move it to the oven. Cook in the oven for 20-25 minutes.

Remove the "crust" and the top layer of parchment paper. Take this time to put on your lovely ingredients! This is how I made mine and it was like heaven:


  •  Baked chicken breast (already prepped)
  • Spinach
  • 1 clove garlic chopped up into larger pieces
  • 2% mozzarella cheese (about 2 tablespoons, very light)
  • Crushed red pepper flakes
  • Organic traditional tomato sauce (1/2 cup)


After you top the pizza with your ingredients, put it back in the oven for another 15-20. The crust will not be crisp, at least mine wasn't. However, that did not stop it from being absolutely lovely. I am going to try some other things eventually to try and crisp it up, but for now this is a great low-carb day meal!

* Put cauliflower in a food processor and pulse until the cauliflower reaches an almost "rice" looking texture. 

Monday, August 13, 2012

New Dress and Homemade Sushi!


 Hey guys! Hope you've had a great Monday. Yesterday I did end up going to the mall and picking up a really lovely dress for a friend's wedding at the end of the month. It's from Forever 21. I got it for about $18.00. I love that it's simple, yet really chic. 


I had been prepping a lot of brown rice to use for meals and noticed how sticky it was after it was done. Tangent: brown rice, real brown rice not instant, takes so long to cook! But, it was so worth it. I like prepping food and having easy access to meals. Anyway! I had bought a package of Nori (Seaweed/Sushi Paper) a while ago hoping for the chance to be able to learn to make sushi. I was feeling experimental and ended up making really lovely Clean Tuna Sushi!


Ingredients:
  • Nori
  • Tuna (water packed, low sodium if possible)
  • Celery, Cucumber, Carrot sliced very thin and long (can use other add-ins! Avocado, sweet potato, shrimp, chicken, ect!)
  • Low Sodium Soy Sauce (optional)
  • Brown Rice (already prepped)

Spread the rice out on the nori. I used rice sparingly because I like to watch my carbs, but 1/4-1/3 of a cup should do. It is easier to spread if your hands are a little wet. Lay out the veggies and tuna about 1/3 of the way in to the nori paper. Roll it up! I trimmed the ends and then cut them into 3-4. How I have mine made, one roll is about 115 calories and clean! Wonderful alternative to going to and buying sushi and it's cheap!

Saturday, August 11, 2012

BIG UPDATE :3

Hey, guys! I am really sorry that I have been slacking so hard in the blogging department. I am usually pretty busy with work, the gym, cooking, and trying to spend time with my friends before school starts back up and I have to move at the end of the month. Anyway, I am going to try to be more active on here. I want to start posting more recipes since it is easier to type them out here than to constantly be typing them out on instagram.

I have been making a lot of amazing foods lately that I have been happy about. It is so great that even while eating clean you can eat fantastic foods and not feel guilty or have it set you back. I have been trying to gain some weight with a lot of frustration. It's terribly difficult. Now, I know there are people who will say "What?! I wish I could lose weight, not put on weight!" Well, honestly, when you are trying to gain it is pretty much just as difficult. I don't want to look bony, I want healthy, happy, and fit.

These are my latest progress shots. I feel like I look healthier, which is the most important. I love that I can go to the gym and am starting to lift heavier and see results. I know a lot of ladies think that lifting will make you look masculine and bulky, but it won't! If you are worried about that, try low weight and more reps.

Now, on to some food! I have made a few foods that I have really liked over the last few weeks, but since I had been slacking so horrible on here I may have forgotten some things, but I promise to try and get you all the yummy goodness I come across and make.


Tasty Turkey Bell Peppers

A package of extra lean (99%) ground turkey
6 green bell peppers (on the larger side)
2/3 of a large red onion
2 jalapeno pepper (optional, I like the spice)
2 15-16 oz jars low sodium/sugar spaghetti sauce

optional/add-ins:
black beans
corn
spinach
other veggies
cheese (low-fat/skim)

Preheat your oven to 400 degrees and cut the tops off of your 6 green peppers, takeout the core and seeds and wash. Don't throw away the tops! Brown the ground turkey on a non-stick skillet. Cut up your red onion, other veggies, and take the tops of your green pepper and dice them up and toss them in the party as well. Take a second skillet and cook the veggies. This process took me about 15 minutes. The veggies need to be pre-cooked so they are not really crunchy, but I like a little crunch to my veggies sometimes.

Put the hollow bases of the green peppers you cleaned into a baking dish. Pour one jar of tomato sauce into the baking dish. Once your turkey is browned, throw in the second jar or tomato sauce and the softened veggies. Let it cook for another 5 minutes and then spoon the mixture into the hollow peppers. Fill 'em up! Then, cover the peppers with tinfoil and cook them for an hour. They are so delicious and will definitely be making them again.


I also had attempted another little experiment that I ended up loving! Pistachio "Froyo"

- 1/2 a cup of plain Chobani greek yogurt,
- 1/2 a scoop vanilla whey protein
- vanilla extract
- a packet of raw stevia
- 1/4 a cup of unsweetened vanilla almond milk.

Combine all ingredients in a small bowl/Tupperware container. Mix in some crushed up pistachios. Freeze for a couple hours. After I thawed it, I topped the foyo with some melted whipped peanut butter and some whole pistachios. It was so lovely.


 Another little experimental success. I needed a post-workout snack one day, so I conjured up a lovely Vanilla Protein Mug Cake.

-1/2 a large banana, mushed up in a coffee mug.
- tablespoons of vanilla whey protein, 
- 1 tablespoon whipped peanut butter
- 1 tablespoon coconut flour
- 1/2 tsp baking powder
- a couple drips of vanilla cream all natural liquid stevia (you can also use regular stevia/natural sweeteners)
- 3 tablespoons of liquid egg whites

Mix very well and microwave for 2 1/2-3 minutes, keep an eye on it. I topped mine with a little vanilla protein frosting and some wf no cal chocolate syrup. It would be amazing with chia jam, berries, peanut butter, coconut oil, chocolate, greek yogurt, or cottage cheese. 

One day I had a pair of very sad, almost ready to meet the trash can, bananas. I decided to try a little something and ended up making this amazing Chocolate Protein Oat Cake.

I mashed the 2 large ripe bananas in a bowl with 
- 1 scoop chocolate whey protein
- 1 tsp of baking powder
- 1 tsp of ground cinnamon
- 2 tbsp of organic powdered peanut butter (pb2)
- 1/3 cup of whole grain rolled oats. 

Mix well, preheat oven to 375 and I poured the mixture on to parchment paper in a large pie baking dish. Baked for 25-30 minutes, make sure tooth pic comes out clean. 

The whole thing is 558 calories, but cut in 3 you can have it for 186 calories a slice with 2 grams of fat, 35 g carbs, 5 g dietary fiber, 12 g sugar, 12.7 g of protein. I had a piece for breakfast, it would also be great pre/post workout! Keep refrigerated and eat cold or microwave. Both are awesome.

I think I solved the dry coconut flour pancakes issue yesterday! I wanted lower carb vanilla protein pancakes as my pre-workout, so I made them! Vanilla Coconut Flour Pancakes

 - 2 tablespoons coconut flour
- 1/4 (probably about a tablespoon) of vanilla whey protein
-  6 tablespoons liquid egg whites (2 regular egg whites should work)
- 1/2 teaspoon baking powder
- 2 tablespoons low fat cottage cheese
- 5 drops of vanilla creme liquid stevia (or your choice of sweetener)
* You may need to add a bit of water to the batter if it is too dry. Just do a small amount at a time to make it a bit thinner

Mix the dry ingredients and the wet ingredients in separate bowls well before combining. Cooked on a non-stick pan with non-stick spray or coconut oil. Cook on low heat. Coconut flour can be fussy so be sure to give it time. They can be hard to flip, so let them cook for a while before flipping and you will have much more success. Oh my gosh. These are amazing. So perfect, fluffy, and moist. I topped it with wf calorie free syrup. Simple and seriously perfect. 

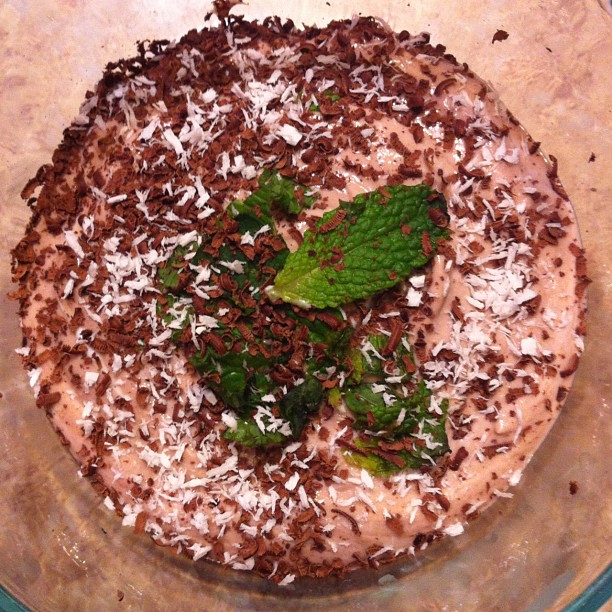
Finally! We have another lovely chocolatey high protein dessert.  Mint Chocolate Yogurt

- 1/2 a cup plain non fat greek yogurt
- 1/2 a scoop of chocolate whey protein

Mix well with sweetener if needed

topped it with shredded organic 85% dark chocolate, unsweetened coconut flakes, and fresh mint leaves. I am so glad I decided to buy mint leaves. They are rather cheap and very nice to have around for some unique flavors. 


That's all the recipes I have for today, but I did want to share one last thing that I have been living on for the last several days since I bought it: All Natural Vanilla Creme Liquid Stevia from SweetLeaf. This stuff is like liquid gold (much like Sriracha!). I have been drinking so much water thanks to this little gem. I have always been obsessed with the scent and taste of vanilla. It has always been my favorite. It makes even plain water taste like a dream. I have stopped drinking all diet soda now because of this. It is no calorie, delicious, and worth the price. I was buying packets of Raw Stevia and spending $3-$4 for 50 packets,  I bought this for $11.00 and I use it like crazy. Definitely getting this again and I urge you to look it up online or see if your local grocer has it in the organic/natural section. I know they have other flavors online, like Toffee. 

There you are guys! Hope you enjoy and let me know what you think of any of these recipes. 

xo Meg

Sunday, June 24, 2012

Berry Good!

Hey guys!  I hope you have had a nice couple of day. I had yesterday as well as today off so I have been relaxing. Yesterday I went and bought myself two pairs of denim shorts from American Eagle. I felt I deserved them. I had only one pair of shorts to wear outside of my gym shorts and they were way too big on me. I spent $45 and got two pairs. American Eagle's denim seems to be the only ones that fit me well.
I was astounded because I actually managed to fit into a size 2 with room to spare. I don't like my shorts to be skin tight. I fit into a 0, but decided to go with a more comfortable size 2. I have never in my life fit in a size 2 and it is such a great feeling. I have been working so hard to maintain a healthy lifestyle and when it pays off, it is amazing.

I went to the grocery store late last night on a berry run. I needed fruit for work and they had pretty good prices so I stocked up. I have even more strawberries than this, they just didn't fit in my massive container! I also picked up green tea, turkey lunch meat, peaches, a tomato, avocado, and more Greek yogurt.

This morning I made a banana protein pancake from leftover batter I had in the fridge. I still have some left, so I may have another once I get home from the gym later for my post-workout.
I served it with a side of mixed fresh berries, green tea, and a simple blackberry chia seed spread.

The spread is so simple and delicious for pancakes, and healthier than syrup. I took 1/4 a cup of blackberries, 1/2 a tablespoon of chia seeds, and half a pack of stevia and mixed them together, mashing the berries. I microwaved the mixture for about a minute and a half, took it out and spread it on my pancake. SO GOOD!

I hope you guys have a wonderful day. I am planning on going to the local market with my boy in a while just for something to do. If they have some nicely priced produce, I may be picking up some veggies. I also am planning on hitting the gym for a leg and ab session today. Good luck and stay cool!

Thursday, June 21, 2012

Oh, man is it hot today! I mean, scorching! I don't mind the heat as much as I used to, but at my job where I sit with no air conditioning with long pants, boots, and a long sleeve shirt it really gets to you! It is so important to stay hydrated in this heat so make sure you're drinking a lot of water!

Yesterday my boyfriend and I went out to dinner at Red Lobster. I ended up eating two of their biscuits, ugh. They are so horrible for you, but they are delicious. I haven't had them in a really long time (or white bread/flour at all for that matter), so I shouldn't feel too bad about it. I also got a garden salad with no dressing (I never use dressing, I usually always use fruit to sweeten up my salads). For dinner I got half a serving of wood fire grilled tilapia, steamed broccoli, and wild rice. It was very good! I really like tilapia. It is such a mild fish and it absorbs flavors very well. If you haven't tried it yet, I really suggest you do!

After dinner we went over to the grocery store. I needed several things and I got paid today so I splurged on a couple things I have wanted for a while.

I have been hearing so much about coconut oil, so I spent about $7 to buy the organic kind. It has a ton of health benefits and is one of the best cooking oils for you. I also got raw stevia, some small packs of nuts, greek yogurt for my lunches and also for recipes, a bulk size of rolled oats (not the quick cooking kind!), and some produce.

After I got home, I decided to make a recipe I had seen on Instagram (I get a ton of recipes and ideas from that phone App, I must say I am addicted). This one was banana protein muffins, from user msheard13.
They were pretty simple and ended up tasting very lovely, the ingredients are:
  • 1 whole ripe banana
  • 3/4 cup egg whites
  • 1/2 plain low fat greek yogurt
  • 3/4 cup of oats
  • 2 scoops of vanilla whey protein
  • 12-14 packs of stevia (I used 12)
  • 1 tsp of baking powder
  • 1 tsp of baking soda
  • 1/2 tsp of ground cinnamon
I mixed all of the ingredients in my food processor and blended. Preheat the oven to 350 degrees, spray your muffin tin with non-stick cooking spray (I used some of my coconut oil), spread the mixture evenly between two muffin trays (12 count). Bake for about 18-20 minutes and test them by sticking in a tooth pick to be sure they are done in the middle.

For one of these delicious bad boys it is about 60-75 calories. They are great for pre or post workout and taste lovely. I plan on topping some of them with peanut butter and nuts, or some non-fat greek vanilla yogurt and some banana slices. I put some in the freezer so they would keep longer.

I hope you try them!

Wednesday, June 20, 2012

Protein Pancakes

I have been trying to perfect my protein pancake making and it really is not working too well! Whenever I don't have any flour in the mixture, it is very difficult for me to keep the pancakes from going to complete mush when I flip them. I don't like when my food turns out looking like baby food! What can I do to make my protein pancakes stay whole? They always stick to the bottom of the pan, even with spray and low heat.

However, I did make some protein pancakes that were pretty delicious. They had carbs, but I am ok with that today because I need the energy. It is supposed to be around 97-99 degrees today, plus I will be going to the gym soon for an arm and cardio session.

This lovely giant protein pancake topped with whipped peanut butter, half a banana, flax seeds and chia seeds ended up being about 500 calories, but it was filling and will give me the protein and carbs I need to fuel my workout. To make two servings of batter:
  • 1/2 cup of oats
  • 1/2 cup of cottage cheese
  • 4 egg whites
  • 1 tsp vanilla extract
  • 1 tsp baking soda
  • 1/2 a large banana
Put all the ingredients about in a food processor and blend. I had attempted to make half the batter without wheat flour, but it ended up making a mess (a delicious mess, but I like pretty food, not mush). I added 1/4 a cup of wheat flour to the second half of the batch and they turned out like the photo above. A beautifully formed pancake. You can make them either way, and they will both be delicious.