Showing posts with label protein. Show all posts

Saturday, October 13, 2012

Pumpkin Protein Doughnuts

I was a busy girl today! I took my day off to sleep in a bit. I got up around 8:30 and have been on my feet ever since running errands and cooking.

First Dylan and I ran around to several stores including Party City, Target, Bed Bath and Beyond, the local Mall to hit Hot Topic, and then finally Vitamin Shoppe.

I had a very sucessful haul today shopping. I got something for my Halloween costume, a digital scale, doughnut baking ban, brag's liquid aminos, a new pair of work-out pants, and some vanilla almond crunch Quest bars that I have not tried yet! I really have wanted a digital food scale for quite some time. Weighing food is so much more accurate than going by measurements. I hope that using it will help me to gain some lean muscle weight because my food calculations will be more accurate. I also had big plans for the doughnut baking mold. I have been eyeing this pan up for quite some time, but didn't have the money. So, I got a 20% off coupon in the mail for Bed Bath and Beyond and decided today was the day! Then, I put it to use tonight and made PUMPKIN PROTEIN DOUGHNUTS!

What you'll need:
for the doughnuts-
1/4 cup (4 tablespoons) of coconut flour
1 1/2 scoop of vanilla flavored whey protein (I used Optimum Nutrition vanilla ice cream flavor)
1/2 cup of pure canned pumpkin
1 large whole egg
2 large egg whites
1 teaspoon of pure vanilla extract
1/4 cup of raw stevia
1/2 teaspoon of nutmeg 
2 teaspoons of ground cinnamon
 1/2 teaspoon of baking soda
1/2 teaspoon of cream of tartar
1/2 cup of vanilla unsweetened almond milk

for optional "frosting":
2 tablespoons of non-fat plain greek yogurt (I always use Chobani)
1/4 teaspoon of xanthan gum
2 packets of raw stevia
5-10 drops of vanilla creme liquid stevia

Preheat your oven to 350 degrees. Mix your wet ingredients for your doughnuts together and also the dry separately before combining and mixing well. Spray your doughnut baking pan (these could very easily be made into muffins as well!) with non-stick spray. Fill the molds with your batter. I baked mine for about 15-18 minutes. Toothpick should come out clean after sticking one into a doughnut. You can top it with the vanilla creme "frosting", more cinnamon, or pumpkin flavored cream cheese spread, or get creative. These are high in protein and low in active carbs. You could eat two (...or three) without the guilt! These would be good for pre or post workout as well.

I really can not wait to make up more doughnut recipes for you guys.

I also have been working on slowly sampling Artisana products that they were kind enough to send me to write a review for you guys. I should have that up at some point later this week. I have been sampling the packets slowly because I have cut nut butters out (except for peanut flour sparingly if I need it). I know, I am such a nut butter freak. I had to cut it out because I was getting out of control with the portioning and I also want to see how cutting out some fat does for my abs. I will be eating my beloved nut butter again very soon, but for now I have been forced to be creative with my nightly casein protein snack. I have been known for using a lotttt of peanut butter. But, I like having to think up some alternatives for a couple days. 
This is so good and tastes kind-of like amazing pumpkin cream cheese. 1/2 cup plain non-fat greek yogurt (Chobani), 1/4 cup non-fat cottage cheese, 1/4 cup pure pumpkin, 1 scoop vanilla ice cream whey from Optimum Nutrition, ground cinnamon, pumpkin pie spice, 2 packets of raw stevia, and 1 tablespoon coconut flour. Mixed well topped with 1 tsp organic brown sugar, 1 tbsp coconut flour, and 1 packet of stevia along with 1 tablespoon of unsweetened almond milk and mixed well into a crumble-like texture. Finally, 2 tablespoons of Kashi go lean cinnamon crumble.


Another awesome purchase of mine this week was from Target. I finally was able to find tea that I have been looking quite some time for! Sugar Cookie Sleigh Ride by Celestial Seasonings! You probably are thinking, there is no way that a tea can taste like sugar cookies.. WRONG! This tea is so fantastic it is even boyfriend approved. With just some stevia and a little bit ok unsweetened almond milk to bring out the flavor, it tastes like a liquid cookie. Very good for soothing sweet tooth cravings like I get so badly! I also bought some French Vanilla coffee that was on sale and like most vanilla flavored things it is delicious. I gotta have a caffeine, one of my vices!

I hope you guys are having a great restful weekened!

Meg


Sunday, October 7, 2012

Candy Cravings! Almond Joy Oats and Cake Batter Protein Pancakes


Hi everyone! It’s Sunday. Working another 8 hour shift of overtime today. Although my job is not very physically taxing and really is quite pleasant for the most part (who can complain about blogging, reading, texting, playing video games and watching films all while at work?), working 48 hour weeks is taking a toll on me. At least I am making money and getting closer to being able to sign up for the NASM personal training certification course. That is what is keeping me going: imagining my possible future that all of this extra time I am working will help me pay for. Have to work for what we want!

I’m sitting here typing this and sipping on some pumpkin spice coffee and trying to think of topics to discuss. Nothing is coming to me! I need you guys to give me some feedback on what types of things you would like to see me discuss on here. Leave me a comment and let me know some questions or things you would like me to talk about. Of course, remember that I am not an expert and anything I say on here is strictly personal experience and what works for me.

I have been trying to experiment with combinations of food. One of my favorite things to do is to take a bunch of different veggies with (or even without sometimes) a lean protein and mix them together.

I was in the mood for pineapple chicken quesadillas, so I made a big batch of pineapple, 
low sodium (also well rinsed) black beans, chicken breast, tomato, kale, red bell pepper, jalapeno, 
and sweet onion that I can use in burritos/quesadillas/eat as is! 


Sometimes if you have no idea what to eat is to look what you have, and just throw things together! 98% of the time I love the turn-out and then you know another meal you can make if you’re lacking in creativity or ideas on a particular day. We all have our creative slumps, with a clean eating lifestyle it is so important to keep things interesting and not eat the same things every day.

For breakfast the other morning I basically had a candy bar… No, not an actual candy bar, but it was delicious enough to be!! I was craving an Almond Joy so badly, so I made some Almond Joy Egg White Oats!

What you’ll need:
½ cup of whole grain rolled oats (cooked in 1 cup of water on medium heat)
2 large egg whites
2-3 packets of raw stevia (or more depending on how sweet you want your oats)
1 tablespoon of coconut manna (1/2 for in the oats, 1/2 for on top)
1 1/2 tsp of unsweetened natural cocoa powder
¼ cup unsweetened almond milk
1 tablespoon of shredded unsweetened coconut flakes (for on top)
6 almonds (for on top)

Cook your oats like normal in water, adding the cocoa powder, ½ tablespoon of coconut manna, and 2 egg whites about 1-2 minutes before the oats have finished cooking. Then mix in your stevia (or natural sweetener of choice) and a bit of unsweetened almond milk. Top with the second ½ tablespoon of coconut manna, coconut flakes, and almonds. I like to pour a bit of unsweetened almond milk around the edge of the bowl. This turned out so lovely and pretty that I had to share it with you guys! Definitely a nice pick-me-up.

At work I have been reading a book I recently purchased on me Acer Iconia Tab Tablet ($200, GameStop) written by Michael Pollan called The Omnivore’s Dilemma.  I was told that I should read Pollan’s books by a friend. The book is so interesting and informative. I never knew that the history of Corn was so fascinating and rooted in our society. I like it so much so far that I have ordered one of his other books from Amazon called In Defense of Food. If you are interested in food and nutrition, I highly recommend his books. His writing style is fantastic.

Since I am so interested in nutrition and health, I am trying to start reading more books about the subject so that I can be more informed (especially for when I become a personal trainer, and hopefully nutritionist). One of the best things you can do if you have a question about a topic or just want to be more educated in a realm of study is to do research! Understanding of a topic does not just happen. Seek to learn as much about a subject as you can so that you can make informed decisions! If you are new to a healthy lifestyle and feel lost and confused, look up some things! I frequent health, fitness, and bodybuilding blogs daily to help me learn more. There is an endless stream of information available to you right at your fingertips, so use it! Read some books and studies. We all started somewhere!

When I woke up this morning I thought about how I have not had protein pancakes in a while. I went to Wegman’s yesterday and picked up some new goodies to try out. One of the purchases was some gluten free yellow cake mix from Betty Crocker:


Although it may not be 100% “clean” it is one of the better cake mixes without a ridiculous list of ingredients. Thanks to Heather who has some recipes using this brand of cake mix, I picked it up after seeing it on her blog.

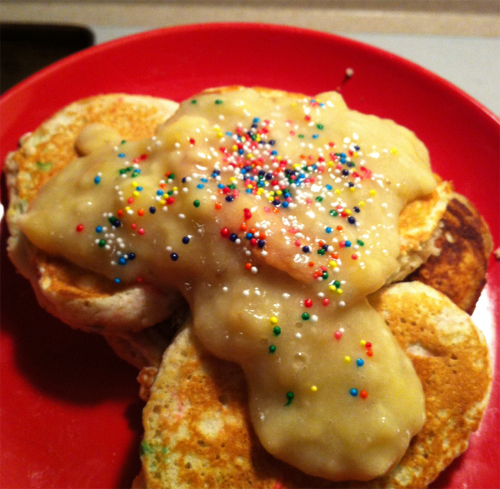
I made cake batter protein pancakes with banana frosting! These are the prettiest and most colorful pancakes I have ever made. They really cheered me up and got me ready for my shift today.


What you’ll need:
For the pancakes
½ scoop vanilla ice cream optimum nutrition whey protein
2 tablespoons oat bran
2 tablespoons coconut flour
2 tablespoons yellow Betty Crocker gluten free cake mix  
2 large egg whites
1/3 cup unsweetened almond milk
1/8 tsp of baking soda and also cream of tartar
a bit of rainbow sprinkles (optional)

For the frosting
 1/3 of a mashed large banana
1 tablespoon of unsweetened almond milk

I mixed the dry ingredients and wet ingredients for the batter prior to combining. Mix well. Add the sprinkles last and don’t mix them in too much or all of the color will come off. White they are cooking on a non-stick sprayed pan, make the frosting. My recipe made 5 smaller pancakes. I topped the pancakes with my banana frosting and bit more sprinkles. It was so delicious! I love fun colorful food. Nothing wrong with some sprinkles once in a while. I hope you guys have and/or had a great day and enjoy your Sunday!
Meg x

Saturday, September 29, 2012

Cheesy Cauliflower Garlic Sticks

Sometimes I am really craving a good garlic-stick. Well, sometimes it isn't the best time to eat something super greasy from a pizza place. I decided to make a cleanish treat that would satisfy my craving for a pizza shop staple that is low carb and high in protein and made: Cheesy Cauliflower Garlic Sticks!


What you'll need:
One cup of riced cauliflower
2 large egg whites
2 tablespoons of almond flour/meal
1/2 teaspoon crushed red pepper flakes
1/2 teaspoon italian seasoning mix + some on top of the cheese
artisan blends parmesan cheese

and
parchment paper
1/4 cup reduced fat mozzarella cheese
1 clove of garlic, chopped up fine

Preheat your oven to 350 degrees. Rice your cauliflower and combine it in a bowl with the ingredients listed above except for the 1/4 cup reduced fat mozzarella cheese and clove of garlic. Take a baking sheet and put a piece of parchment paper down, then spread the well mixed ingredients onto it. Spread it out so it is a rectangle or square (or whatever shape :P). Leave a little thickness to it. I placed another sheet of parchment paper on top. Bake for about 15 minutes. Remove from the oven, flip the "crust" over and remove the sheet on top. It should be a bit browned on top. Place it back onto the baking sheet and spread 1/4 cup of the mozzarella cheese on top, sprinkle some italian seasoning mix on top of the cheese and the well chopped garlic clove. Place back into the oven for about 10-15 more minutes or until it is browned and cheese is melted. Mine made 8 garlic sticks.


For 1/2 of the cauliflower garlic sticks (mine made 8 total), there were about 182 calories, 11.2 grams of fat, 4.2 saturated fat, 4.7 grams carbs, 1.3 grams dietary fiber, 1.2 grams of sugar, and 17.4 grams of protein.

I served mine with organic traditional tomato sauce. This would also work really perfectly as a crust or pizza base. I am going to make it again with spinach, tomato, and garlic. I really hope you guys experiment with this recipe. I really enjoyed it and so did my taste tester, my Aunt.


Friday, September 21, 2012

Savory Chocolate Zucchini Protein Bread


Hey guys! I hope you all had a fabulous rest of your week! It’s Friday and I am so happy to be able to relax and stay up later this evening (for me, that will probably be around 11:30 haha). Over the next several weeks I am going to be working overtime due to not having enough officers to staff sites. That’s ok though! I pretty much am just picking up 8 hours on Sundays. I have decided to start saving the overtime money to put towards getting certified in personal training through NASM and then after I get that, I am going to get the certification for nutrition through them as well. I am so excited that I have decided to do this. Working out and eating healthy has made amazing changes in my life and I want to be able to help people make those same changes. First step is getting CPR/AED certified. Going to work on getting that first because it is the cheapest part of this journey. I am so excited!

Last night I had picked up a new ingredient at the store that I keep seeing in a lot of protein recipes: cream of tartar. When I bake with protein a lot of times the muffins and breads seemed to go flat. Cream of tartar works with baking soda in order to help firm up egg whites and give baked goods a better density and consistency. I got the all natural brand and it was about $6 for a decent sized shaker. Of course I had to experiment right away! I have some zucchini in my kitchen that needs to be used up, so I took one medium one and created a savory and delicious Chocolate Protein Zucchini Loaf.  


What you’ll need:
1 medium zucchini grated finely and moisture squeezed out (about a cup of zucchini)
½ tsp all natural baking soda
½ tsp cream of tartar
½  cup almond flour/meal
2 tablespoons coconut flour
1 ½ scoops rich chocolate whey protein (I used Optimum Nutrition)
2 tbsp all natural unsweetened cocoa powder (I used Hershey’s)
4 packets of all natural raw stevia
2 egg whites
½ cup unsweetened almond milk

I preheated my oven to 350 degrees. I grated my zucchini finely into a bowl. Once it was grated, I squeezed out the excess water from it. Once drained of excess moisture, I added in the almond flour, protein powder, cocoa powder, stevia, and coconut flour. I mixed those and then added in the unsweetened almond milk, 2 egg whites, and mixed those into the batter well. Make sure to mix it really well to make sure the protein and cocoa doesn’t clump up in your bread. The last two ingredients I added were the baking soda and cream of tartar. Mix well again. I took a medium bread loaf pan and greased it. You can use coconut oil or non-stick baking spray. Pour the well mixed batter into the loaf pan. I baked my bread for 35 minutes. It came out smelling so amazing. I was surprised that I was able to make this bread so easy compared to my other breads that came out looking flat and lifeless. My boyfriend, aunt, and little cousin all tried it. It was a hit and they said they want more! It is always a plus when I get something kid approved! He was shocked when I told him there were veggies in that bread. The only change I am going to try next time I make this is to add a little more stevia to see if I can make a sweeter version. Maybe even some honey or agave. Overall, I was super pleased with this recipe. It would go well paired with nut butter, greek yogurt, cottage cheese, pretty much anything really because it is a savory bread. I really was digging the macros as well:


For the recipe how I made it the calories are about 106 calories for 1/6 of a loaf. 5.0 g of healthy fat, 5.9 g carbs, 3.1 dietary fiber, 1.3 g sugar, 10.3 g protein.

I plan on experimenting with more breads this weekend and maybe even muffins! So, hopefully I will have more recipes for you guys soon. I hope you enjoy this one if you make it. Let me know how it turns out by tagging me in your photo on Instagram. I love seeing people’s variations of my recipes <3 x

Monday, September 17, 2012

Huge Recipe Update!


Hey guys! Happy Monday. I am so sorry that I have been slacking in the updates department again. It is so hard for me to find time to type up everything and then I get a bunch of backlogged recipes where I have to post a bunch in one post! I hope you all understand. I do work full time and go to the gym after work and then once I go home I pretty much spend the rest of the evening cooking and prepping for the next day. In total, I probably only relax 2 hours a night with my boyfriend. But, I will still update when I have time. I also need to update the recipe page pretty bad! Haha I am so behind!

Let’s start with my hearty fall-inspired Sweet Potato Protein Pancakes!


What you need:
1 small-medium sweet potato cooked and skin removed and mashed
1-2 tablespoons of unsweetened vanilla almond milk
2 tablespoons coconut flour
1 scoop vanilla whey protein
Ground cinnamon to taste, I used about ½ a teaspoon
1/8 teaspoon baking powder
3 egg whites

Combine wet ingredients and dry ingredients separately before mixing them together. I added the mashed sweet potato in last and made sure to really mix it well. Depending on the size of your sweet potato you may need to add more or less unsweetened vanilla almond milk. Cook on a stovetop with coconut oil or non-stick spray. My recipe made 4 delicious and filling pancakes that I topped with Walden Farm’s zero calorie pancake syrup.


My second recipe for you guys was inspired by the lovely @fitkitten on Instagram. Spicy Corn, Black Bean, and Red Pepper Pulled Chicken 
 What you’ll need:
1 ½ lbs (I used 2 ½ breasts) boneless skinless chicken breast
1 jar of Corn, Black Bean, And Red Pepper salsa from Desert Pepper Trading Company
1-2 tsp crushed red pepper flakes
¼ cup of water

Put all ingredients into a Crockpot set to high heat. Mix all the ingredients well and let it cook for about 3-4 hours. I usually pull the chicken apart at hour 3 and allow it to cook for another hour or so. Make sure to periodically check on it and stir it around, if you need to add more water for moisture do so! Don’t want dry chicken.

I love this recipe because you can leave it cook while you prep other food and then you have a delicious side or main course to combine with other meals. I like to use this chicken on tacos/burritos, on cauliflower or brown rice, or you can even make a Mexican inspired pizza! Try with your favorite jar of all natural salsa. I also made it with Newman’s Pineapple salsa and it tastes amazing!


The third recipe is one that I am really proud of. It is high in protein and carbs and great for a pre or post workout meal! Chocolate Protein Bread Pudding!
 What you’ll need:
3 slices whole grain bread (I use Nature’s Own whole grain and no sugar, 50 calories a slice)
4 large egg whites
1 whole egg
2 packets of raw stevia (add more if you want more sweetness)
1 scoop chocolate whey protein
½ cup of unsweetened almond milk

Mix the eggs, stevia, protein, and almond milk together in a bowl. Mix it well; we all know how protein can be fussy and chunk together, especially with eggs. Rip up 3 slices of whole grain bread or bread of choice. Allow the bread to soak in the liquid for about 10 minutes. Spread in a baking pan greased with coconut oil or non-stick baking spray. Spread mixture evenly into the pan and allow to bake for 15-25 minutes at 325 degrees. Check on it periodically, I notice my oven seems to cook really quickly.

I made this the night before I needed it for a quick breakfast and added chocolate PB2, banana slices, and some Walden Farm’s zero cal pancake syrup. It was heavenly. I love desert for breakfast!


If you follow my Instagram, you may have noticed I have a pretty mean sweet tooth. One night before bed I really was craving chocolate cake but I also wanted my casein as well! So I created this Layered Chocolate Cookies and Cream Casein Microwave Cake
 What you’ll need:
For the cake:
½ a small banana mashed
1 egg white
 ¼ tsp baking powder
1 tablespoon Dark Chocolate Dream Peanut Butter from Peanut Butter and Co
½ tbsp unsweetened natural cocoa powder
1 ½ tbsp coconut flour
About 1 tablespoon unsweetened almond milk

Mix all the above ingredients together in a mug and microwave for about 2 minutes keeping an eye on it to be sure it doesn’t overflow. If It need to cook further just add 30 second increments. Allow to cool for a few minutes and remove from the mug. Cut it in half and fill with the following:

For the filling:
6 oz plain non-fat Chobani
½  a scoop of Cookies and Cream Optimum Nutrition Casein
(If I was to make this again, I would include some xanthan gum to thicken up the casein a bit)
Topped all of that with another dollop of Dark Chocolate Dream. This was so delicious and really satisfied my craving for cake. The mug cake was pretty delicious on its own too.


Another creation I whipped up and was really happy with was Mini Coconut Flour Muffins. I made these one morning for breakfast when I wanted something filling, low carb, and savory. 
 What you’ll need:
3 tablespoons coconut flour
1 tbsp unsweetened natural apple sauce
1 packet raw stevia
½ tsp baking powder
1 egg white
½ cup unsweetened almond milk
A couple drops of caramel flavoring essence

Mix dry ingredients and wet ingredients separate before combining. In a baking pan greased with coconut oil or non-stick spray evenly disperse the batter into the 6 compartments and allow to cook for 10-15 minutes at 350 degrees. I topped these flaky savory mini-muffins with some peanut flour butter. I loved these. They would even make a nice low-crab alternative to dinner rolls.


One side I threw together and really enjoyed the outcome was Cinnamon Stevia Chickpeas and Sweet Potatoes. They are high in protein and healthy carbs!
 What you’ll need:
1 medium sweet potato
1 can of low sodium chickpeas, rinsed
About 1 tbsp ground cinnamon (or more if you like)
4-6 packets of raw steiva
1 tablespoon coconut oil

Preheat your oven to 350 degrees. Open your can of chick peas, drain and rinse. Throw them into a pot on the stovetop with a tablespoon of coconut oil and allow them to cook for about 5-8 minutes. Stirring to make sure all the chickpeas get covered in coconut oil as well as precooked evenly. While those are cooking, chop up a medium sweet potato into small cubes. Grease a baking sheet with coconut oil or non-stick spray. Add the sweet potato in with the beans and stir them together allowing them to also get coated in some coconut oil. Add cinnamon and stevia. Remove from heat and evenly spread the mixture onto the greased baking sheet. I allowed them to cook for 10 minutes, took them out and stirred it up, placed it back into the oven for another 5-10. Super easy and delicious! I added some baked chicken breast for a post-workout and it was an awesome combination of protein and carbs that had a nice sweetness. Definitely will be making this again as a side, or even a main course with the baked chicken breast.  Again, my oven seemed to cook this really quickly, so times may vary.


I also made some Low-Carb Falafel Balls for snacking, sides, lunch, or a dinner if I choose. I love falafel. I think the flavors are so delicious together, especially paired with some Cucumber Sauce! I have been craving falafel lately, but since I have really been keeping an eye on carb intake, I was kind-of worried about the high carb amount. I got to thinking and realized I had riced cauliflower in my fridge that I needed to use up. So I got to creating.

What you’ll need:
1 can organic chickpeas/garbanzo beans (low sodium)
dash of sea salt
juice from ½ a lemon
1 cup of “riced” cauliflower
2 tablespoons coconut flour
4-5 sprigs of fresh parsley
3-4 cloves fresh garlic
½ a red onion
Fresh ground black pepper
2 egg whites 

(I liked the way this recipe turned out, but it did end up a bit drier than I would have liked due to the coconut flour and cauliflower. I think when I make them again that I will add more egg and/or coconut oil to the mixture to give it some more moisture.)

Open the can of chickpeas and rinse them well. Rinsing beans is important because it helps to get excess salt off of them. Reducing sodium is always something I try to think about since it causes me bloating. Throw the beans into a food processor and blend until they are chopped up roughly. Remove and place into a large bowl. Cut ½ a red onion, peel 3-4 cloves fresh garlic, and your parsley and put that into the food processor next. Let it go until it is fine. The boyfriend doesn’t like large chunks of onion so I am always sure to make them diced up really well. Add that to the bowl with the ground chickpeas. Next, cut a lemon in half and squeeze the juice from half into the mixture. Next add a dash of sea salt and fresh ground black pepper. I already had the cauliflower riced in the fridge, so I measured out a cup and added that to the party. Next, add the 2 tablespoons of coconut flour and finally 2 whites from large eggs. Mix all of the ingredients together well and form into balls. My batch made 22 balls. I baked them for 10 minutes, then took them out and flipped them; put them back in to bake for another 10-15. While they were baking I made the cucumber sauce:

1/3 of a large cucumber
6 ounces of nonfat plain Chobani Greek yogurt
Fresh ground black pepper to taste
A dash of sea salt
1/2 tsp xanthan gum (to give it a little thickness)

Mix these ingredients well in the food processor (after you cleaned it from making the falafel).
For one ball, my nutritional facts came out to be: 26.3 calories, 0.2 g of fat, 56.7 mg sodium, 4.1 g carbs, 1.3 g dietary fiber, 1.5 g protein


For dinner tonight I made some amazing Eggplant Chicken Parm:


What you'll need:
1 small eggplant
2 tablespoons coconut flour
1 egg white
1 tsp crushed red pepper flakes
1/2 a pre-cooked chicken breast
1/4 cup organic traditional tomato sauce

Preheat your oven to 350 degrees. Cut up your eggplant into slices that are about 1 inch in thickness. Combine the coconut flour and red pepper flakes together and put the egg white in a separate bowl for dipping. Dip the eggplant first into the egg, then into the flour and red pepper mixture. I didn't want a really thick breading, but if you do you can use more egg and coconut flour. Put the breaded  slices onto a baking sheet with coconut oil or non-stick cooking spay. Put into the oven for 15 minutes, then take out the eggplant, flip them, turn off the oven and put them back in for about 10 minutes. Allow enough time for both sides of the eggplant to brown a little bit. Top the eggplant with chicken breast that has already been baked. I finished off the dish with 1/4 cup organic traditional tomato sauce, italian spices, and a bit more crushed red pepper flakes. Then, chow down! I love this recipe so much and it is low-carb!


PHEW! That was a lot of recipes! I really should keep up so that I don’t have to do these massive posts. Haha. I hope you guys enjoy and please let me know if you decide to use any and how they turned out. As always, I am megameows on Instagram, so tag me and let me see what your lovely creations are! <3 x